Monday, April 30, 2012

Winner!

I won a $10 gift certificate from the Fab Shop Hop....  This is what I decided to get - came to $11 with shipping...


Fifty 1930's reproduction nickles!!  I have more from a nickle swap at the guild, so now I have enough for a baby quilt!

Wednesday, April 25, 2012


Isn't this the coolest bag you've seen?  It's made from selvages from fabrics!  Sheryl (Scrapquilter at Quilting Bee) made it for me as the FIRST place winner of the Project Linus Challenge!!!

I've seen this before and have wanted to try it... now I don't have to!!!  Cool!!!

Saturday, April 21, 2012

I fell off the wagon

My goal for this year was not to buy any fabric - to make a quilt a month all from stash.  I broke down and bought some WOW and yellow for the Dresden plate as I was out of those,   I was happy that I only bought what I needed and no more.  Actually, I have enough left over to add to another project and will definately use them this year.  I feel only a little guilty for my purchase, but I bought them with a project in mind and they have helped me keep moving on with my goal so I can justify the purchase.

But today... well, I just couldn't help myself. 

There was no project in mind but the price was too good to pass up!! 


It was a nice day today so I decided to stop off at the first garage sale of the year.  I had never been in that neighborhood before and it was a very pretty drive so even if I didn't find anything, the view was worth it.  The seller had the usual eclectic collection of items, and a box labeled 50 cents each.  It had a selection of needlecrafts, including several felt snowman kits that wrap around a 2 liter bottle.  Ok.  for 50 cents, I bought all three - such a bargin!  Then, at the bottom of the box I found....  this wonderful baggie of goodies!!

It was a Moda 2008 Fat Quarter Club package (still in it's original wrapping) from the Fat Quarter Shop!!!  12 Moda Fat Quarters, brand new, all for 50 cents!!   Score!!   I can't believe I almost missed it! 

Do I feel guilty for buying it?  No way!  This was too good to pass up.

Now to find the right pattern to make with it.  Any ideas??

April's Quilt is done

I quilted up the Dresden plate and put the binding on it.  It'll be a birthday gift for Kelly so I wanted it to be done BEFORE her birthday (a unique concept for me!).  It came out pretty good!  I think she'll be pleased with the results, it's so bright.  It's perfect for spring.

Monday, April 16, 2012

Dresden Plate, Part Deux

Since it's going to be a gift that will be given in a month, I figured I better get busy and quilt it up!  I only worked 1/2 day today, so this has been one of my projects.


The centers of the plates are done with a circle feather template, the petals are just out lined, and the white background is a small meandering. The borders/sashing is done with a free-hand flower motif.  It's a small project, so it's gone pretty quickly.

I realize (after I started quilting it) that I'm not entirely happy with the sashing/borders, but it works.  Lesson learned... next one I make will have shashing that is worthy of all the work the plates took.  This one seems a little plain to me.

New goal.... dress up my borders and sashaings to make my quilts more interesting!!

Bags

One of my favorite things to make is bags, and this is one of my favorites!  I've made several, and my daughter, Christina, has said it is the perfect diaper bag - roomy enough to hold lots of stuff.  So I now make them for gifts. 


I put lots of pockets inside to hold things, plus I use plastic canvas for the bottom to add some structure.  


I don't have anyone to give it to - yet.  But one thing I'm trying to do is have a variety of things made so when I do need a gift, I've got them done and I can "shop" my own gift shop!! 

This bag goes nicely with a quilt I made six years ago for a technology class.  The idea was to create a power point show that taught something.  I did mine on quilting.  I still have the top - I haven't quilted it yet.  It's been hanging over my upstairs railing, adding some color and style to my staircase.  I think I'm going to have to quilt it soon and add it to the bag for my gifts.


Saturday, April 14, 2012

Dresden Plate

I rarely plan out what I'm going to make next, relying instead on inspiration to strike.  My quilt guild (
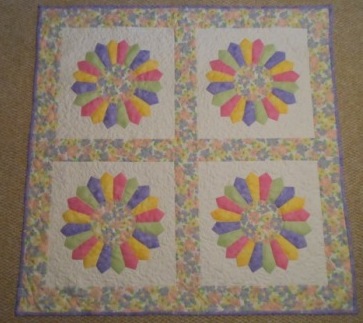
NLCQG) has a table that everyone can bring old issues of magazines they no longer want and share with others - one woman's trash is another's inspiration!!  In a McCall's August 2003 issue, I found a pattern for a Dresden Plate called "Antiquity," and in my goal to try different things this year, I decided it was time to tackle this oldie but goodie!! 


Everyone knows how much I don't like doing hand applique (carpal tunnel makes it difficult), but this one called to me with how I could do to all on the machine.  The instructions were pretty sparce so I decided to share how I tackled (and won!) this project and to give you some tips if you should decided to try it yourself.  I used the pattern provided in the issue, but you could also use this acrylic template and instructions.  I bought it so I could do this one again - someday!


The pieces were easy to cut the pieces by rotary cutter (a must for me).  The only curve was at the bottom and I used a pencil to draw that on the fabric and cut with scissors. 

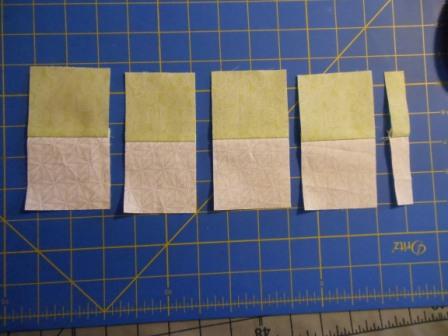
The first step is to fold your pieces with wrong sides together and sew 1/4 inch from the top .


Put your fingers inside the pocket you made along the seam and turn the seam inside out.  I used a large pair of scissors to push the point out, but I had to be very careful so I would not push the tips through the point.


Press the point flat.  You need to be careful to get the seam in the center of this piece or you will get lopsided points.  Making a plastic template with the center lines to help with this step would be a good idea, but I'm too pumped to take that time now!! 

I was making only four blocks so I cut all my pieces at once, then sewed them all, then pressed.  It went very quickly, which is how I like my projects.

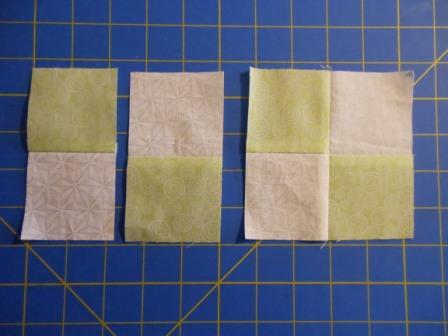
Once you have your points made, you get to sew them together.  Hint:  take a few back stitches at the top to lock the top folded edges together.  This helps keep your pieces from pulling apart when you press them.  I also didn't skimp on my 1/4 inch seam.  This is one block where less is not more, especially if you are using provided patterns!  I pressed all my pieces the same direction, but you can also press toward the dark side.


I made units of two, then units of four since I was making a four color plate.  My pattern called for 20 pieces to make one plate, so I used five units of four to make my plate. 


Next, I traced a circle to place over my hole.  I cut it 1/2 inch larger than the pattern and I'm glad I did!  I stitched 1/8 - 1/4 inch away from drawn line with a longer stitch length.  Place your pattern piece in the center (I used cardboard) and pull the ends of the thread until the edges curl in around the template.  Then press to make a nice crisp line.  Remove the template.


Pin this circle over the hole of your plate, using lots of pins to stablize it, and sew in place using your favorite method.  I used a small zig zag  stitch, taking one bite off the circle and the other on.


 Once all your plates are done, it's time to put them on your backing fabric.  I cut mine 16" x 16" because I'm making a wall hanging.   Fold your backing in quarters and press.


Place your plate on your backing and chose a point or seam to line up with the pressed marks.  I used a seam.  Pin in place using lots of pins to stablize.  Then sew using your favorite method.  Again I used the small zig zag. 


Now you can put them together however you like!  I used a simple 3 1/2" sashing between the blocks and as the border, but you can be as creative as you'd like.


This one is going to Kelly for her birthday.  She wants a new spring quilt.  Do you think she'll stop hinting she wants my Tulip Time?

Tuesday, April 10, 2012

Fell off the wagon

Hello, my name is Sue and I'm a fabricaholic...

My goal this year was to make a quilt a month - all from stash.  No buying fabric!  Well, I fell off the wagon!! Kinda... the decision to buy fabric was a conscious choice because of a specific project I'm working on. And I bought only what I planned on buying!

It all started when I broke my serger needle while making PJ bottoms for Aiden. I needed a specific size not available at WalMart, so off I went to JoAnns. Since the trip was deliberately planned, I decided to pick up some fabric to finish my project.

I bought 4 yards of WOW - I was out of white and need some for my next project. No other color in my stash would do, so what's a girl to do?

I also bought 2 yards of light yellow.... Yellow isn't one of the colors that usually goes on clearance (when I buy most my fabric) so I have virtually no yellow in my stash. I really need to it make the quilt I'm working on more interesting.

I may have slipped, but at least it was reasoned out and I didn't go wild with my purchases! 

Whew...

Wednesday, April 4, 2012

April BOM

This month will be a simple celebration of Easter colors!

Easter Star

12 1/2” unfinished block

#1 Fabric:  White on White  (WOW)
Cut   2                             5 1/2" X 5 1/2"
Cut 2 strips                    2  1/2” X 10 1/2”
#2 Fabric:  Your Choice of Pastel
Cut  2                       5 1/2" X 5 1/2"
#3 Fabric:  Light Green
Cut 1 strip                     2  1/2” X 10 1/2”
Cut 1 strip                     2  1/2” X 5 1/4”

#4 Fabric:  Light Yellow
Cut 1 strip                2  1/2” X 10 1/2”
Cut 1 strip                2  1/2” X 5 1/4”

Hourglass units:

First we will make half-square triangles:

1.      Draw a diagonal line on one #1 WOW  5  1/2"square.   Place this square on top of one of the #2 Pastel  5  1/2" square with right sides together.  Sew a 1/4 inch on either side of the diagonal line.   Cut on the drawn line and press seams to dark side.   This will make 2 half-square triangles.


2.       On the wrong side of one of these half-square triangles, draw a diagonal line between the two corners NOT on the seam line. 


3.      Layer these two blocks with right sides together and WOW fabrics matching the Pastel fabrics halves.  Match the center seams well.  Sew a 1/4 inch on either side of the diagonal line.  Cut on the drawn line and press seams to one side.  Trim to  4  1/2 inches square.  You will have 2 completed hourglass units.  Repeat steps 1, 2, & 3 with second set of squares.  You should have 4 hourglass units total.


4 patch units: 

  1. Place one #1 WOW  10 1/2” strip on one  #3 Light Green 10 1/2” strip, right sides together.  Sew scant 1/4” from edge.  Press toward the light green strip.  Cut into four units that are 2 1/2 inches wide. (There will be a small amount of fabric left over).


  1. Using two of these units, place as shown below with right sides together, and sew using a scant 1/4” seam to create a four patch unit.  Repeat for other two units.  You will have two completed 4 patch units that should measure 4 1/2” X 4 1/2".


  1. Repeat steps 1 and 2 with the second #1 WOW strip and the #4 light yellow strip.  You will have two completed 4 patch units that should measure 4 1/2” X 4 1/2".
    
  
  1. Repeat step 1 with the 5 1/4 inch strips of #3 light green and #4 light yellow fabrics.  Cut into 2 units that are 2 1/2 inches wide.  Repeat step 2 using these two units.  You will end up with one completed 4 patch unit that measures  4  1/2" X 4  1/2".
 

Finishing:

Sew the all the units together as shown below.  Don’t be afraid to use pins to match all the seams properly!


Here's some things you can do with this block!