Tuesday, January 31, 2012

February 2012 BOM

As promised, it's time for February block. Everyone only associates February with Valentine's day, but, as those of us who grew up in the 50's and 60's know, it's also a couple of president's birthdays. Who else remembers getting at least one of those days as a holiday at school?

So in honor of the birthday of the father of our country (February 22nd), I chose to use Martha Washington's block. And because it's close to Valentine's day, I wrote it up using red and pink as the outer colors of the star. But, this BOM is YOUR quilt, done in your colors, so you choose what you want to do!


Martha Washington

 12 ½ inch unfinished block

For flying geese:

Cut 4 each from pink fabric:
3 1/2” squares
3 1/2” by 6 1/2" rectangles
Cut 8 from red fabric:
3 1/2" squares
For center square:

Cut  from off-white fabric:
Two 4”squares
One 4 1/4” square
Cut 1 from a dark fabric:
4 1/4” square


To make flying geese (Make 4): 

  1. Draw a diagonal line on the wrong side of each 3 1/2” red square.


  1. Place one red square on the left side of one pink rectangle with right sides together.  Sew along the diagonal line.  Hint:  Sew slightly off the line toward the outer corner and the unit will measure a more accurate 3 1/2” X 6 1/2".


  1. Cut 1/4” away from the sewn line and press open toward the red fabric.


  1. Place a second red square on the right side of the rectangle with rights sides together and repeat step #2.


  1. Trim 1/4” from the sewn line and press open toward the red fabric.


 6.  Square up unit to measure 6 1/2” X 3 1/2"  (if needed).   Repeat 3 more times and place all 4 completed flying geese units to one side.


STOP!

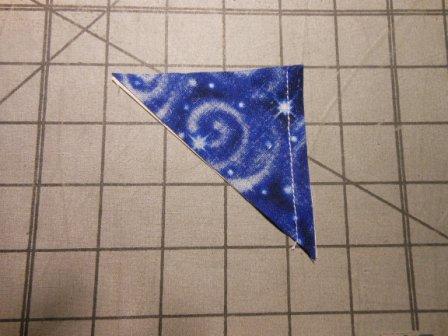
Don't Throw away those triangles you cut off the flying geese!  Sew 1/4 inch from the cut diagonal, press toward the dark color, and square them up to 2 1/2 inch for 8 HST for a later project!


Now lets work on the center square unit.


To make center square:

1.      Cut both of the 4” off–white squares once on a diagonal.  Set aside.


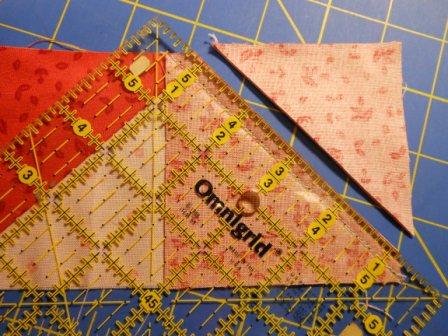
2.      Place a dark 4 1/4” square on the off–white 4 1/4” square with right sides together.  Cut on both diagonals to make four quarter-square triangles sets.


3.      Using scant 1/4” seam, sew each set together as shown below.  Press set open toward the darker fabric.  Do this a total of 4 times so you have 4 units.


4.      Place one of these units and one of the off–white triangles from step 1 with right sides together.  Sew using a scant 1/4” seam.  Press open towards the off—white triangle.  Square up unit to 3 1/2".  Repeat three more times.

5.      Sew all four of these units together as shown below.   This center square should measure 6 1/2” X 6 1/2”.


6.   Sew all units together (using the four 3 1/2" pink squares in the corner) in three rows using all scant 1/4" seams, as shown below.  Press seams in alternating directions by row.


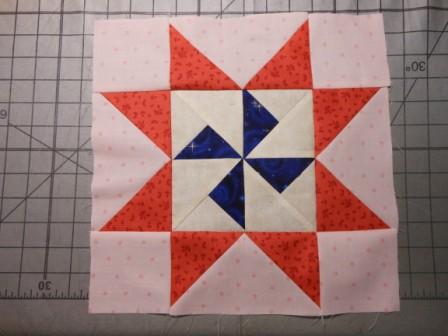
So what can we do with this block?  Well, here's a few ideas:


So, how are you doing??  I hope you are enjoying this as much as I am writing it! 


Monday, January 30, 2012

It's Here!!!

As part of our duties of BOM coordinator for our guild, we not only get to pick the theme and the block, but fabric too!  It came in today!!  I've spent several happy hours cutting and bagging the fabrics for our participants, and when Heather drops off the copies, I'll stuff the patterns in too. 

Are you getting antsy for the second BOM installment??  I'll give you a hint... Think February!!!

Here's another hint.... 


Last hint... if you are thinking hearts -- well, just remember that the theme of the BOM is Stars!!

Sunday, January 29, 2012

Winter Star

I think I'm getting burned out trying to do all I want to do!  I really accomplished a lot in January, starting with the BOM and making a top from that block.  I made some fun projects and gifts.  In looking for my next project, I took on a long time desire of making a winter wall hanging for ME!!

My decorating theme in January is snowmen - I have so many I can't put them all out at Christmas so I save them for January. I've wanted a wallhanging to go with this theme and was looking for something with a snow theme.  It took me several weeks of searching and I had thought I found the right one. But when I found this beauty in a Connecting Threads calatog, I realized that this was the one I was waiting for!!  This wall hanging has a very rich look, so much more elegant than the snowman I originally was going to settle for. 


I recreated it using my EQ5 and played around with fabrics.  One of my goals this year is to create everything from my stash and not have to buy fabric.  I had to change the original pattern slightly to accomodate that goal and am very pleased with my results! I used half square triangles to make all the diamonds.  Most match up very nicely and from a distance you can't tell I didn't cut diamonds.

 It's only 42 X 42 so was a small project.  It took me a good 4 days of planning, cutting and sewing, and I even am pleased with the quilting.  My ego took a huge bruising this year at our county fair because my quilting wasn't up to par.  I'm trying hard to improve, but sometimes my desire to finish quickly gets in the way of quality.


I finished the binding tonight and had to hang it up right away.  It'll come down for show and tell at my guild's meeting Wednesday night and then because I used a marking pencil to trace some feathers, I'll have to wash it.

On to the next project!  Or maybe I'll clean my house tomorrow....  It's been neglected lately...

Sunday, January 22, 2012

Weekend Sewing

I'm getting frustrated while trying to write out instructions for March's block of the month.  The measurements aren't coming out clean and "nice" for a 12 inch block so I may have to rethink what I'm going to do.  So to get over my frustration, I've been working on some other projects. 

I've finished Shannon's nightgown and made a pair of PJ bottom's for DJ too.  The first thing Shannon asked when she saw me was "did you finish it?'  She loved it.  DJ was happy he got something too.

That reminded me I needed to make some PJ bottoms for my grandson Aiden's birthday next month.  He wants sharks or lizards.  I found material for both in my stash!  So I made him two pairs of sleep pants and two pairs of sleep shorts for summer.


His mommy, Christina, says she'd like a tote with lots of pockets for the Leappad he's getting.  So off I go to the internet to get inspiration (and maybe a free pattern?).  Nothing catches my eye except.... 

My husband gave me a Kindle for Christmas.  The case he bought for it doesn't fit the Kindle Fire, so I thought I might try my hand at making one... and lo and behold...   I found a pattern for an IPad while looking for Aiden's case!!  It took me a while, and a few changes to the directions, and a lot of frogging it (rip it, rip it), but I'm pretty pleased with the result.


Pretty cute huh??  Here's where I got the pattern/inspiration:  http://www.madebymarzipan.com/.

So I feel I accomplished something this weekend.  My search is still on for a great snowman/winter wall hanging for my living room.  I have a few that "will do" but they aren't "the one" that inspires me or drives me to make them.  Maybe some more searching for eye candy/inspiration on the internet will come up with something.  We'll see what tomorrow brings!

Wednesday, January 18, 2012

Little Hands

Today was early release for some schools in our area.  Kelly asked me to watch her 6 year old daughter until she got home.  Shannon followed me up to my sewing room, with a plan in mind. The conversation started out with the pajamas I made her for Christmas....  And like any smart girl, she announced she needed more.  So I put her to work.

She picked out a nightgown pattern from my files (I never get rid of anything) and picked out the flannel material from my stash (leftover from Black Friday shopping at Joann's).  She helped me lay out the pattern and watched me pin it down.  Then I had her cut out on the long lines while I cut the curves.  She really didn't do too bad for her first time!!


She noticed a needle threader I had at my workspace and asked how it worked.  So I gave her a needle and thread and had her try to put the thread through the eye.    I couldn't get the camera fast enough to catch the faces she was making as she tried to thread the needle, but this one is close:


She gave up so gave her an impromtu lesson on threading the needle using the threader, then showed her how to sew fabric together - like the lacing cards she got for Christmas.  She was very interested and asked very good questions... 

I was her age when I started sewing so we'll see what happens..  Maybe I'll make a quilter out of her yet!! 

Hats

I've been all over the place with my sewing this week.  First Baprons, now hats.  A friend has been in the hospital for brain cancer.  I've known her since high school.  She's undergoing radiation treatments now and will have chemo later.  I thought I'd cheer her up with some hats.


The one on the left is an old pattern I got years ago from McCalls.  I added the flower on my own. It's a little big on me, but it's soft and looks cute.

The one on the right was from:  http://www.headhuggers.org/patterns/spatt01.htm.    It's a pretty simple, straightforward pattern that was a snap to make.  I hope she likes them.


Tuesday, January 17, 2012

Snowy Day Projects

It's lightly snowing here in southern Wisconsin.  I'm dividing my time between watching the snow,  playing on the computer and playing in my sewing room.  The snow takes turns falling gently to the ground, then whips up in a frenzy as the wind catches it and flings it all around.  There's no rhyme or reason to the inconsistant wind.  As for the computer, I love getting inspiration from some of the blogs and postings on facebook, and I save the ones that catch my fancy for "some day."  I usually never do them and they sit in a file on my computer or as printouts in my bookcase.  Well, today has become "some day" and I'm in my sewing room, trying out some new ideas I found.

My first project is a Bapron.  What is a Bapron you may ask???  A Bapron is a bib that also looks like an apron. I found a tutorial here:  http://www.craftinessisnotoptional.com/2011/05/bapron-tutorial.html,  but if you Google "Bapron" you'll find others.


Here is a pic of the Baprons I made.  Cute huh?


The backs are made out of leftover flannel from my Christmas gifts and just as cute as the fronts!


These are just like potato chips - very addictive because they are so quick and easy to make.  I even made the bias binding, piecing my strips on the bias too!  It goes so much faster and you get less burnt fingers when you use a bias maker. 


I've had mine for a while now, but never used it.  Now I'm going to get one in each size and use them instead of buying bias tape!

 I enjoyed this project very much.  Hope you enjoy it too.  On to the next project...  I need a wall hanging for January.  I'm thinking of snowmen to match my knick knack theme...

Monday, January 9, 2012

First Quilt done of 2012

So, another one of my goals for this new year is to stash bust - to make quilts entirely from my stash - even using stash as backing if possible.   A third goal is to make one top per month, hopefully using the blocks I'm posting, but I'm not limiting myself  to them.  Then, as I need a gift, I'll quilt them, or when I get a few done I can clean up my quilting table and do them all at once.  This particular goal will depend on how many days I have to substitute teach...

Well, the month isn't half way over and I'm done with the first quilt top.  I have to make a confession - I was inspired to make the first BOM because I wanted to make this quilt!!  It's so bright and cheery, it will make a great child's quilt.


Yay!!!  I think I'm getting the hang of inserting pictures the right size!

Anyway, I also tried a new (to me) technique of piecing the borders on the bias.  I've always just met the ends of the strips and sewed them straight across.  I think I like the way this looks a whole lot better!


If you look hard, you can see what I mean. 

Anyway, it's time to start working on the next block!   Have fun with your own projects and let me know how they are going!


Wednesday, January 4, 2012

Whew!  I'm finally done posting my first block for our BOM!  Enjoy!


Friendship Variation 1


12 ½ inch unfinished block

Cut 2 of each
5 inch squares of Color 1
5 inch squares of Color 2
Cut 4:
5 inch squares of white on white
Cut 1:
4 ½ inch square of white on white

1.      Make Half Square Triangles (HST): 


Draw a diagonal line on the wrong side of each 5 inch white square.


Place one white 5 inch square on top of one blue square with right sides together.  Sew a scant ¼ inch on either side of the diagonal line.


Cut on the drawn line and press seams to dark side.  Trim to measure 4 ½ inches square.


2.        Sew half square triangles (and 4 ½ inch wow) together  in three rows using all scant 1/4" seams, as shown below.  Press seams in alternating directions by row.


To make a 9 inch block, cut squares to make HST 4 inches, then trim to 3 ½ inches square.
To make a 6 inch block, cut squares to make HST 3 inches, then trim to 2 ½  inches square.

Layout Options:

Under the Stars

Hello all!

The holidays are over and the house is somewhat clean from all the festivities.  I still have to take down the Christmas knick knacks and put up the January snowmen knick knacks, but I've been working on a new project that has become a passion.

A friend of mine (you know who you are Heather...) asked me if I'd like to help her take over the Block of the Month (BOM) program for our quilting guild (Northern Lake County Quilter's Guild).  I had been thinking about doing this for a while now, so I said yes.  The other reason I said yes is that I have wanted to start designing quilts and this would get me off my duff and make that dream happen.

We decided to shake things up a bit for the ladies of the guild and have a theme for all the blocks this year.  We are calling it "Under the Stars" because all the blocks will have a star theme.  Each month, we get to choose a block everyone will make.  They turn in their completed blocks for a chance to win them all - enough to make a nice size quilt. 

We have issued a challenge to our quilters to also make a block for themselves.  At the end of the year they will have enough for a sampler quilt - following what a more traditional BOM is like.  They then will put it together for judging by the rest of the guild.  At this point, I have no idea what each block will  be or what MY finished quilt will look like, but I'm excited to find out.

I'd like to invite all of you to join in the BOM.  I am going to try my hand at writing instructions for each block and we are going to start out easy.  Each month will add a new challenge or different technique for construction.  We all have our favorite ways of making block piecess like Half Square Triangles (HST) but I hope you will enjoy experimenting with some different ways to create them.  Who knows, we may even try the dreaded "A" word (those who know me, know how much I don't like to do applique).

Don't forget to let me know how I'm doing so I can get better at this!  Let the fun begin!